Disclaimer: Hpool is not based on chia’s pooling protocol, the official code that enables pooling isn’t ready yet. Hpool is a closed source pooling software for chia. You need to keep in mind that if you go to Hpool you have to share your mnemonic. Mnemonic is your 24 words that is your private key for accessing your wallet. If somebody has your mnemonic then the person can open your wallet and send/receive XCH, it’s like leaving your real life wallet unattended in a bar.
Why people joins to Hpool?
I think the answer is simple. Blockchain is a business and not a lottery. If you have your plotter/farmer running and you haven’t earned a single XCH yet it can be very frustrating. I saw some people with 0 XCH despite hundreds of plots. One part that frustrates me is – even though I should not complain as I am and We are all early adopters: so problems, bugs should be expected but still (un)expected downtime drives me nuts. Checking my chia client and then realizing I am out of sync or the need to shutdown the the machine for an update just increases the time when my machine is not participating in the network and the chances of winning is 0. By joining to a pool you ultimately become part of a larger entity, and that larger entity hopefully owns larger proportion of the entire network space therefore the chances of wining is going to be higher too. What that means your reward will be small but continuous and more predictable but that amount still depends on the number of plots you have and the network size, there is no way around that. If you shutdown your machine you will not get the reward but for just that short period, once you are back you will continue to receive some mojos.
How you can get started?
I was trying to be as cautious as possible, you may simply just go and download the Windows client from hpool-dev (HPool Dev) · GitHub and you are good to go. What I did was I created a VM for the plotter to generate the signature then setup my Raspberry Pi4 8GB to run the miner software. I was trying to avoid downloading and running hpool from any machines I use on a daily bases or not built specifically for plotting/farming. Why? I do not speak Chinese so I do not know what I signed up for when I download their software. In the next sections I will share the steps with you how you can safely move your existing plots from chia to hpool. I assume you already created a hpool account!
Important: This guide is mainly for those who already has some plots and just want to move them to hpool to farm from there.
First steps – make sure your wallet is empty
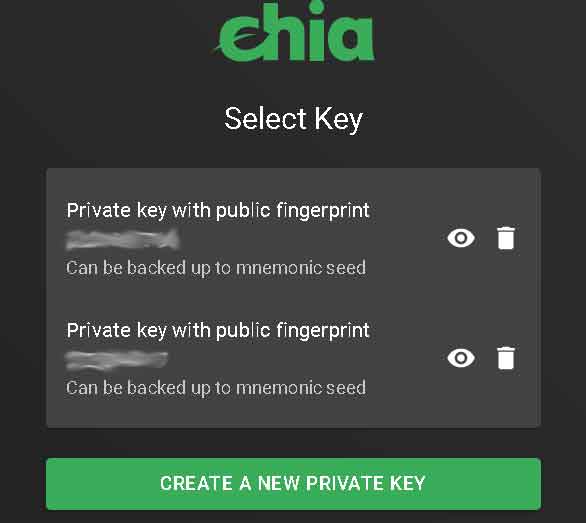
Assuming you have some XCH, you’d better sending it to a fresh new wallet. As your plots are tied to your private key this step is required for security reasons. I would not want to keep XCH on my wallet if the mnemonic is shared with a 3rd party. It’s pretty simple just go to the GUI click on ‘Keys’ and then ‘CREATE A NEW PRIVATE KEY’:

Once that’s done you need to go to the ‘Wallet’ tab and copy the receiving address. Then go back to ‘Keys’ and select the wallet that has some XCHs from where you want to send your coins.

Next go to ‘Wallet’ and paste your new wallet address and set the amount. As the network is not busy you can set fee to 0. One thing to keep in my is, if your wallet is not in sync then you won’t be able to transfer XCH. If you are not in sync you either need to wait or follow this guide: More on sync – part 2. – Chia Blockchain. Wallet sync can take days!
Let’s assume your wallet is in sync and you managed to send your coins to the new address. The problem here is if you go back and open the new wallet in the chia client, then that new wallet has to be in sync which can take hours or not days. More quick is if you go to Search the Chia blockchain (chiaexplorer.com) and paste your new receiving address to the search bar. If the transaction went through then you are good.
Next step is to download the plotter binary from hpool (https://github.com/hpool-dev/chia-plotter/releases) use wget or whatever you like – I did it on a Linux VM to generate a signature. For this you need to copy the mnemonic, the mnenomic where your plots belongs too. You can get the mnemonic by by going to the ‘Keys’ and click on the ‘eye’ icon.
[user@jarvis chia-plotter]$ ./chia-plotter-linux-amd64
chia-plotter v0.11 by https://hpool.com
Input mnemonic word: this is needs to be your 24 mnemonic word
INFO[2021-05-14T10:00:08+02:00] Fingerprint: 111111111
INFO[2021-05-14T10:00:08+02:00] Farmer Public Key (fpk): $farmerpublickey
INFO[2021-05-14T10:00:08+02:00] Pool Public Key (ppk): $poolpublickey
INFO[2021-05-14T10:00:08+02:00] Signature: That's the signature you need to copy and paste it into hpool web
INFO[2021-05-14T10:00:08+02:00] Signature for address: $signature for address
INFO[2021-05-14T10:00:08+02:00] Signature Expiry at: 2021-05-15 10:00:05 +0200 CEST
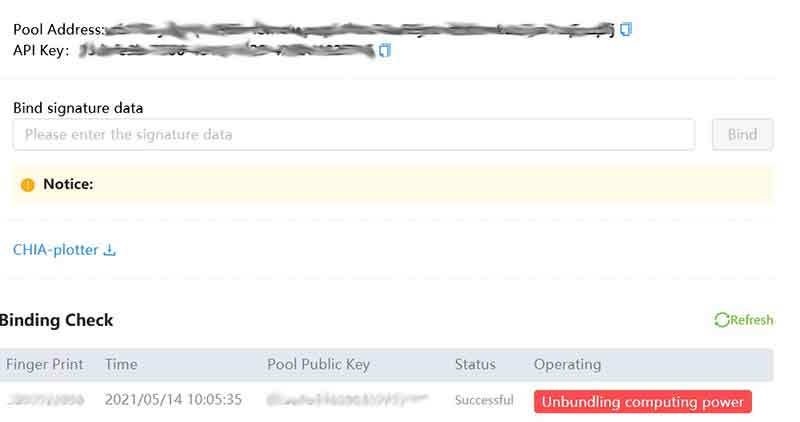
Two things are important here, the Signature and the Fingerprint. Copy the Signature and paste it to Hpool – ‘Pool/Configuration’:

To get this, you need to Create Pool first, please make sure you choose Chia ECO. Then paste it to the ‘Bind signature data’ field and hit ‘Bind’ button. To verify things are good you just simply check if ‘Finger print’ under ‘Binding Check’ matches the ‘Private key with public fingerprint’ in the chia GUI – above’.
If you get here you are all set, we just need to move the plots. As I said i used a Raspberry Pi4 8 GB with Ubuntu:
user@farmer:~$ lsb_release -a
No LSB modules are available.
Distributor ID: Ubuntu
Description: Ubuntu 20.10
Release: 20.10
Codename: groovy
I don’t want to make it as an end to end Linux guide, if you have a Pi probably you know what you are doing. Just in case these are the things I set:
- I enabled the Ubuntu’s built-in FW (based on IPtables): ufw
- I installed fail2ban just to add additional protection: fail2ban
- I made sure SSH is running on a non standard port, setup client timeouts and all that: SSH
The rest is really up to you, you can dig deep as much as you want.
Ok, lets start farming
Download the latest binary from hpool: https://github.com/hpool-dev/chia-miner/releases (again use wget). there are two version 32 bit version and the 64 bit one. Make sure you get the right one.
I downloaded it to my /home/user directory. You just need to unzip it:
$ unzip HPool-Miner-chia-v1.3.0-3-aarch64.zip
Then run it:
user@farmer:~/src/linux-arm64$ ./hpool-chia-miner-linux-arm64
dlsym err: /home/corvin/src/linux-arm64/libchiapos.so: undefined symbol: MySyscall
{1024 524288}
Rlimit Final {1024 524288}
**** Miner:HPool-Miner-Chia
**** Version:v1.3.0 4
**** BuildTime:2021-05-16-16:32:49 GMT
**** MinerName:farmer
**** ApiKey:
请输入Chia矿池ApiKey:
You need to enter the ApiKey then hit enter. Once that’s done there is going to be a config.yaml file in the directory you run miner from. ApiKey is on Hpool ‘Pool/Configuration’ – picture above.
user@farmer:~/hpool/linux-arm64$ cat config.yaml
token: ""
path:
- /mnt/disk1
- /mnt/disk2
minerName: farmer
apiKey: $your_api_key
cachePath: ""
deviceId: ""
extraParams: {}
log:
lv: debug
path: ./log
name: miner.log
url:
info: ""
submit: ""
line: ""
scanPath: true
scanMinute: 60
debug: ""
language: en
What is important here is the ‘path’ and the ‘apiKey’. You can list all the directories where you have your plots.
Adding the disks and making sure they remain online
You need to mount the disks first, my assumption is given you are on Pi you have use USB disk enclosures, which will be important as many put the drives into sleep if they are inactive for more than 10 minutes.
Figure out the disk information:
user@farmer:~/hpool/linux-arm64$ blkid
/dev/sda2: LABEL="hdd1" BLOCK_SIZE="512" UUID="1A7A0FE87A0DDDDD" TYPE="ntfs" PARTLABEL="Basic data partition" PARTUUID="e033b963-blaf-4690-9aca-e9d5f2ee56f0"
Once you have that edit /etc/fstab to make sure these gets mounted upon boot (fstype = the type of the filesystem in use – if you were plotting on Windows then it’s ntfs):
vim /etc/fstab
UUID=$UUID_of_the_disk /mnt/hdd1 fstype defaults,auto,users,rw,nofail,umask=000 0 0
By default many external enclosures spin down the disk or put them into sleep after 10 mins so with this little script you can make sure it does not happen:
user@farmer:~/hpool/linux-arm64$ vim /usr/bin/keepalive.sh#!/bin/bashDATE=date
echo $DATE > /mnt/hdd1/keepalive.io
echo $DATE > /mnt/hdd2/keepalive.io
sync
Then schedule it with crontab to run it every 9 minutes:
crontab -e# then add this to the cron file
*/9 * * * * /usr/bin/keepalive.sh
Ok, so you are all set, lets farm – make sure you are in the directory where the hpool miner binary is:
nohup ./hpool-chia-miner-linux-arm64 &
Logs are here:
./log/miner.log.log or ./nohup.out
If things goes well then:

If you have 0 plots the your miner will not come online. It will take a while to pick up your plots, check the logs and look for:
tail -f ./log/miner.log.log
evel=info msg="new mining info" capacity="0.0 TB" file=loggers.go
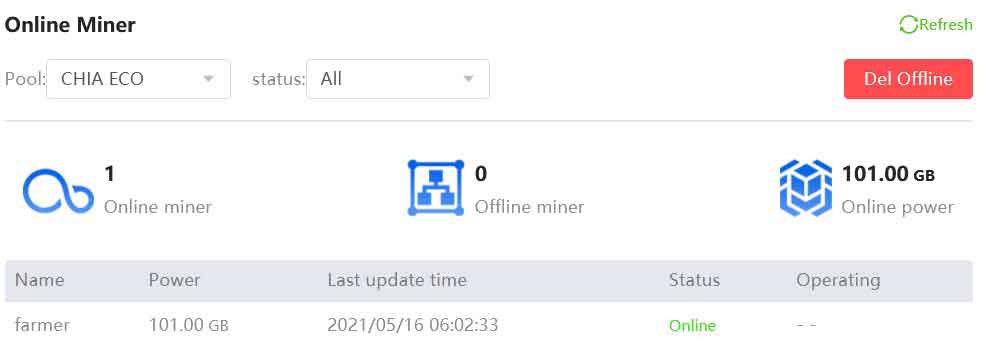
Capacity should slowly increase. On the Hpool site under ‘Miner’ you can check:
- Revenue
- Online Plot
- Contribution
How to estimate earnings?
Once you got here it’s time to get into the financials and see how much money you can earn. Thankfully there is a site for that already: https://hpoolchiacalculator.com/. As the network grows rapidly your earning may change depending on whether you can keep up with it. You can tweak the calculator to take into account this and many other things.


If I add new computer in same network to hpool is it enough to copy the config file and change the path and name or do i have to do anything more?
BR
Vincent
Yes, new name and update the path. What gets your machines ‘connected as one’ is your API key.
Hi, I’ve followed your steps and just get a:
[signal SIGSEGV: segmentation violation code=0x1 addr=0x2fd83f60 oc=0xffff776ffc50]
and the program won’t run.
Can you help me to understand what I’m doing wrong? Config.yaml file looks perfect.
Hi,
You probably using the wrong version of the hpool-miner. If you are using ARM keep in mind there are two version, 32 bit and 64 bit.
I’ve been browsing online more than 3 hours lately, yet I by no means found any attention-grabbing article like yours.
It’s lovely value enough for me. In my opinion, if all webmasters and bloggers made good content
material as you did, the net can be a lot more useful than ever before.
Hey there, I think your site might be having browser compatibility issues.
When I look at your blog in Chrome, it looks fine but when opening in Internet Explorer,
it has some overlapping. I just wanted to give you a quick heads up!
Other then that, very good blog!
Hi, thanks. It’s hard to optimize things to IE, and given it’s EOL I would suggest you to use Edge or something else. Thanks for the feedback.
Thank you for another informative website. The place else may I am getting that type of information written in such a perfect manner?
I’ve a project that I’m just now working on, and I’ve been at the glance out for such info.